Get Started with Local Install
You can install TDengine IDMP locally on a Linux or macOS machine. In this document, Linux is used as an example.
Prerequisites
- Ensure that your local machine meets the minimum requirements for TDengine IDMP. For details, see Planning Your Deployment.
- Install TDengine TSDB-Enterprise version 3.3.7.0 or higher. For instructions, see Deploy from Package.
- Install Java 21 or later.
- Install glibc 2.25 or later.
- Install Python 3.12.
- Setup SMTP email service (required when Internet access is not available).
- On Debian and Ubuntu systems, install the
python3-venvpackage. - A correctly configured system timezone. Refer to your operating system's user manual for instructions.
Install TDengine IDMP
- Linux-Generic
- Linux-Red Hat
- Linux-Ubuntu
- macOS
- Windows
-
Download the installation package from the following link:
-
Run the following commands to install TDengine IDMP:
tar -zxvf tdengine-idmp-enterprise-1.0.14.0-linux-generic.tar.gz && \
cd tdengine-idmp-enterprise-1.0.14.0 && \
sudo ./install.shtipYour machine must be connected to the internet when you install TDengine IDMP. Dependencies are downloaded and installed during the TDengine IDMP installation process.
-
Configure the TDengine TSDB-Enterprise connection in TDengine IDMP:
-
Open the TDengine IDMP configuration file with a text editor. The default location is
/usr/local/taos/idmp/config/application.yml. -
Under the
tda.default-connectionsection, set the TDengine TSDB-Enterprise connection details as shown in the following example:tda:
default-connection:
enable: true
auth-type: UserPassword
url: http://localhost:6041
username: root
password: taosdata
-
-
(Optional) Run the following command to test the connection to TDengine TSDB-Enterprise:
curl --request POST \
  --user root:taosdata \
  --url http://localhost:6041/rest/sql \
  --data 'show databases;'
If the connection is successful, the list of databases in TDengine TSDB-Enterprise will be displayed.
-
Start TDengine IDMP.
sudo svc-tdengine-idmp start
-
Download the installation package from the following link:
-
Run the following command to install TDengine IDMP:
sudo rpm -ivh --nodeps tdengine-idmp-enterprise-1.0.14.0-linux-generic.rpmtipYour machine must be connected to the internet when you install TDengine IDMP. Dependencies are downloaded and installed during the TDengine IDMP installation process.
-
Configure the TDengine TSDB-Enterprise connection in TDengine IDMP:
-
Open the TDengine IDMP configuration file with a text editor. The default location is
/usr/local/taos/idmp/config/application.yml. -
Under the
tda.default-connectionsection, set the TDengine TSDB-Enterprise connection details as shown in the following example:tda:
default-connection:
enable: true
auth-type: UserPassword
url: http://localhost:6041
username: root
password: taosdata
-
-
(Optional) Run the following command to test the connection to TDengine TSDB-Enterprise:
curl --request POST \
  --user root:taosdata \
  --url http://localhost:6041/rest/sql \
  --data 'show databases;'
If the connection is successful, the list of databases in TDengine TSDB-Enterprise will be displayed.
-
Start TDengine IDMP.
sudo svc-tdengine-idmp start
-
Download the installation package from the following link:
-
Run the following command to install TDengine IDMP:
sudo dpkg -i tdengine-idmp-enterprise-1.0.14.0-linux-generic.debtipYour machine must be connected to the internet when you install TDengine IDMP. Dependencies are downloaded and installed during the TDengine IDMP installation process.
-
Configure the TDengine TSDB-Enterprise connection in TDengine IDMP:
-
Open the TDengine IDMP configuration file with a text editor. The default location is
/usr/local/taos/idmp/config/application.yml. -
Under the
tda.default-connectionsection, set the TDengine TSDB-Enterprise connection details as shown in the following example:tda:
default-connection:
enable: true
auth-type: UserPassword
url: http://localhost:6041
username: root
password: taosdata
-
-
(Optional) Run the following command to test the connection to TDengine TSDB-Enterprise:
curl --request POST \
  --user root:taosdata \
  --url http://localhost:6041/rest/sql \
  --data 'show databases;'
If the connection is successful, the list of databases in TDengine TSDB-Enterprise will be displayed.
-
Start TDengine IDMP.
sudo svc-tdengine-idmp start
-
Download the installation package from the following link:
-
Run the following command to install TDengine IDMP:
sudo installer -pkg tdengine-idmp-enterprise-1.0.14.0-macos-generic.pkg -target /tipYour machine must be connected to the internet when you install TDengine IDMP. Dependencies are downloaded and installed during the TDengine IDMP installation process.
-
Configure the TDengine TSDB-Enterprise connection in TDengine IDMP:
-
Open the TDengine IDMP configuration file with a text editor. The default location is
/usr/local/taos/idmp/config/application.yml. -
Under the
tda.default-connectionsection, set the TDengine TSDB-Enterprise connection details as shown in the following example:tda:
default-connection:
enable: true
auth-type: UserPassword
url: http://localhost:6041
username: root
password: taosdata
-
-
(Optional) Run the following command to test the connection to TDengine TSDB-Enterprise:
curl --request POST \
  --user root:taosdata \
  --url http://localhost:6041/rest/sql \
  --data 'show databases;'
If the connection is successful, the list of databases in TDengine TSDB-Enterprise will be displayed.
-
Start TDengine IDMP.
sudo svc-tdengine-idmp start
-
Download the installation package from the following link:
-
Double-click the downloaded
.exeinstallation package and follow the installation wizard to complete the installation. -
The default installation path for TDengine IDMP is
C:\TDengine\idmp. -
After installation, TDengine IDMP related services will be automatically registered as Windows services.
noteThe Windows installation package requires administrator privileges. If you encounter permission issues, right-click the installation package and select "Run as administrator".
DependenciesTDengine IDMP on Windows requires:
- Java 21 or higher, with the
javacommand available in the system PATH environment variable - Python 3.12
- To verify that Java is properly configured, run
java -versionin the command prompt
- Java 21 or higher, with the
-
Configure the TDengine TSDB-Enterprise connection in TDengine IDMP:
-
Open the TDengine IDMP configuration file with a text editor. The default location is
C:\TDengine\idmp\config\application.yml. -
Under the
tda.default-connectionsection, set the TDengine TSDB-Enterprise connection details as shown in the following example:tda:
default-connection:
enable: true
auth-type: UserPassword
url: http://localhost:6041
username: root
password: taosdata
-
-
(Optional) Run the following command to test the connection to TDengine TSDB-Enterprise:
curl --request POST \
  --user root:taosdata \
  --url http://localhost:6041/rest/sql \
  --data 'show databases;'
If the connection is successful, the list of databases in TDengine TSDB-Enterprise will be displayed.
-
Start TDengine IDMP:
C:\TDengine\idmp\bin\start-tdengine-idmp.batOr start the
tdengine-idmp,tdengine-idmp-h2, andtdengine-idmp-chatservices through Windows Service Manager.
Once TDengine TSDB-Enterprise and TDengine IDMP are running, you can access them in your web browser.
- The URL of TDengine TSDB Explorer is
http://ip:6060. - The URL of TDengine IDMP is
http://ip:6042.
Please replace ip in above URL with the actual IP address of your machine. When running ./idmp.sh start, it will detect the IP address automatically and use it as the URL to access TDengine IDMP web console. If the detected IP address is not correct or what you want (for example, you want to access TDengine IDMP by domain name), you can modify it during the start process.
Activate TDengine IDMP
- In a web browser, access TDengine IDMP using URL above.
- Under Activate TDengine IDMP, enter your email address and organization.
- Click Get Code and enter the code sent to your email address.
- Read the User Agreement and Privacy Policy and click Activate.
- In the Privacy Settings dialog box displayed, select which diagnostic information you want to share with TDengine.
- Click Agree.
Enter Account Information
-
On the page displayed, enter your name, phone number, position, and password.
note- Your password must be 8 to 20 characters long.
- Your password must contain each of the following character types: letters, digits, and special characters.
- The following special characters are supported:
. ~ ! @ # $ ^ & *
-
(Optional) Select a profile picture for your account. JPG and PNG files under 1 MB are supported.
-
Click Continue.
Load Sample Scenarios
To help you get started quickly, TDengine IDMP comes with built-in sample scenarios. Select at least one sample scenario to continue:
You must load only one sample scenario at a time. Do not attempt to load a second sample scenario until the previous scenario has finished loading.
- Utilities: A smart meter monitoring system that collects real-time data from electricity and water meters to enable precise energy management and anomaly detection.
- Logistics: A fleet tracking and management system that monitors vehicle location, speed, routes, and overspeed alerts in real time, combining this with mileage analysis to enhance transport safety and operational efficiency.
- Solar Power: A solar power monitoring system that collects real-time data from inverters and environmental sensors to provide a clear view of plant operations and enable intelligent analysis.
- Renewable Energy: A centralized control system for renewable energy that brings together data from wind, solar, and energy storage sources to enable unified monitoring and intelligent dispatch across regional energy sites.
- Wastewater Treatment: A wastewater treatment monitoring system that collects real-time data from bioreactors, membrane tanks, and influent/effluent water quality sensors to visualize the treatment process and enable intelligent control.
- Oil Field: An oilfield production monitoring system that collects real-time data on well output, pressure, and water cut to enable precise, end-to-end management of field operations.
The following sections use the data from the Utilities scenario to demonstrate the features of TDengine IDMP. To follow along, select the Utilities scenario and click Confirm.
UI Tour Guide
The Tour Guide opens automatically when you first log in to your TDengine IDMP instance. Click Next to move through the guide and see an overview of the TDengine IDMP user interface.
You can click the close (x) button at any time to stop the tour. If you want to go through the tour again, click your profile in the top right and select Tour Guide.
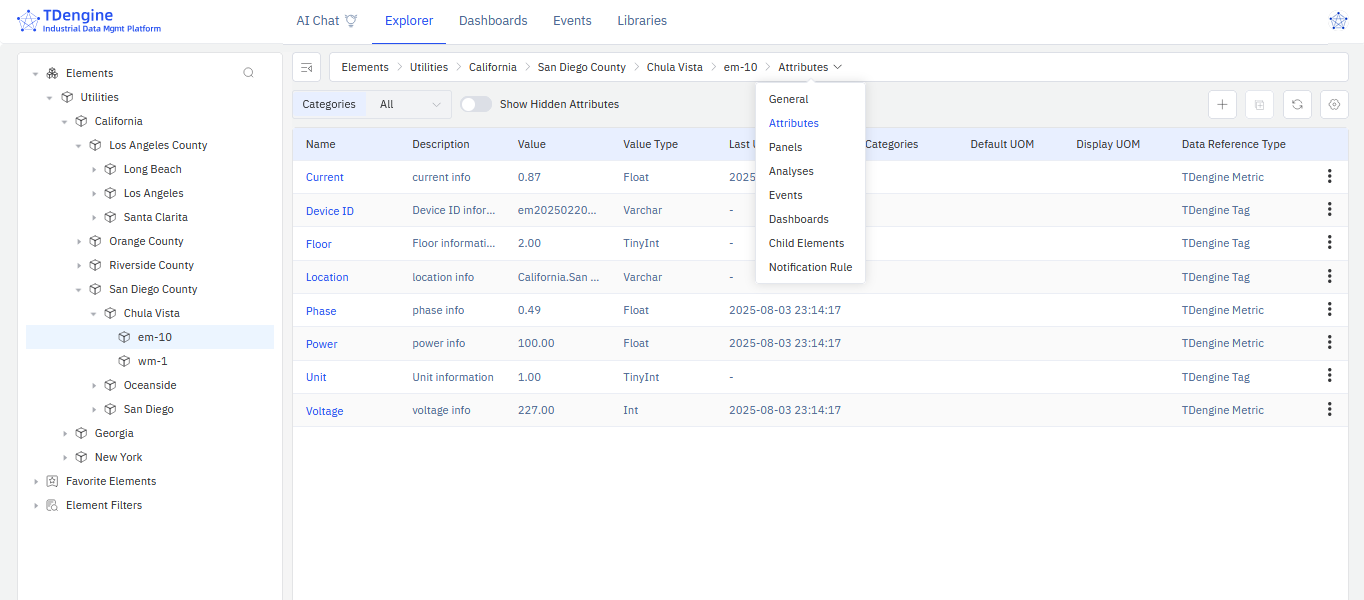
View Element Information
After you have completed the tour, the Explorer page is displayed. You can view information about your elements on this page.
- In the sidebar, click Elements. You can see the various elements in the sample scenario displayed in a tree hierarchy.
- Select Utilities > California > San Diego County > Chula Vista > em-10. This element represents electricity meter number 10 in Chula Vista, California.
- From the path bar, select General to view the description and other basic information about this electricity meter.
- Then select Attributes to view its attributes, such as current and voltage.
Try AI-Generated Panels
One of the most powerful features in TDengine IDMP is the ability to automatically generate data panels using AI.
-
Select the element Utilities > California > San Diego County > Chula Vista > em-10.
-
From the path bar, select Panels. Five AI-recommended panels are displayed. You can click + More Suggestions button to generate additional panels.
-
You can also describe the panel you want in natural language using the input box below the recommendations.
For example, you could enter: "Show a line chart of the voltage and current changes every minute for electricity meter em-10 over the past 24 hours." Then click Ask AI to generate the panel you described.

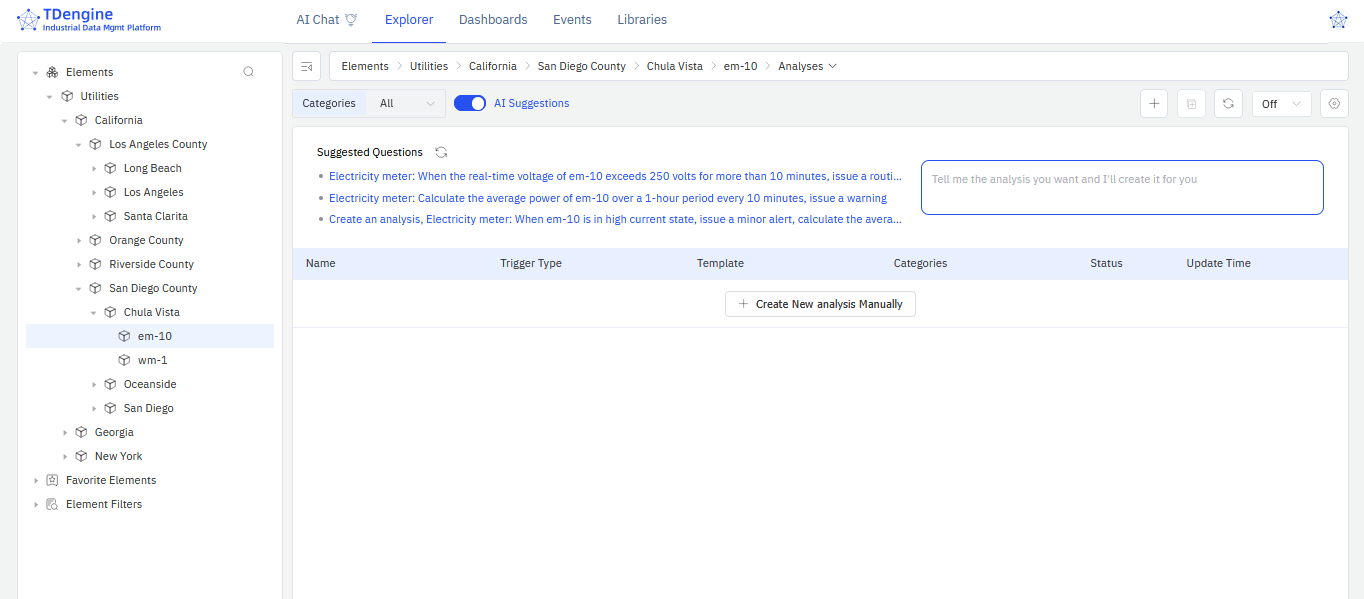
Try AI-Powered Analysis
TDengine IDMP provides AI analysis to help you detect data changes in real time. When anomalies occur, the system can automatically generate events and trigger alert notifications.
-
Select the element Utilities > California > San Diego County > Chula Vista > em-10.
-
From the path bar, select Analyses. Three AI-recommended questions are displayed.
-
To load one of the AI suggestions, click the link. On the page displayed, you can fine-tune the AI-generated configuration. Click Save to complete the setup.
-
You can also describe your analysis in natural language using the input box next to the recommendations.
For example, you could enter "If power fluctuation for electricity meter em-10 exceeds plus or minus 20% for 30 minutes, generate a 'warning' level alert and calculate the fluctuation range." Then press Enter to generate the analysis you described.
What to Do Next
You’ve explored how to view element data and use AI to automatically generate panels and analyses using the sample dataset. Next, you're encouraged to dive deeper into TDengine IDMP’s capabilities and best practices to make the most of its powerful data management and analytics features.
Uninstall TDengine IDMP
Once you’ve completed your evaluation, you can uninstall TDengine IDMP.
- Linux/macOS
- Windows
Run the following command to uninstall TDengine IDMP:
sudo rmidmp
Double-click C:\TDengine\idmp\unins000.exe and follow the uninstallation wizard to complete the process.
For more detailed instructions on starting and stopping the service, see Local Deployment.
