6.9 Batch Analysis Workbench
This guide is intended for users who need to configure batch production processes, import batch events, and compare multiple batches. It describes the complete workflow from process recipe configuration to saving a batch analysis panel.
6.9.1 Overview
A process recipe defines the hierarchy of a batch production process. Recipe-based event import creates event data that conforms to this hierarchy, and the Batch Analysis Workbench compares metrics from different batches at each process stage. The complete workflow is as follows:
Configure a process recipe
  ↓
Download an event import template based on the recipe
  ↓
Complete and import the CSV events
  ↓
Group events by recipe in the event list
  ↓
Add one or more batches to the Batch Analysis Workbench
  ↓
Compare element attribute curves by process stage
  ↓
Save a batch analysis panel for later restoration and continued analysis
A process recipe can define levels such as Order → Batch → Unit → Operation → Phase. During import, the system validates event templates and level attributes against the recipe. The Batch Analysis Workbench then organizes events by recipe level and compares metric curves from different batches by process stage.
For general event comparison, duration normalization, and envelope analysis, see Event and Batch Analysis.
6.9.2 Prerequisites
Before starting, confirm that your templates, permissions, and analysis data meet the following requirements:
- Your account has permission to view, create, or edit process recipes and to import events.
- A base event template has been created for the recipe and allows extension through inheritance.
- The base event template defines level attributes such as order number, batch number, unit, and operation.
- If different levels require different event templates, child event templates inherited from the base event template have been created.
- To generate metric comparison charts automatically, events must be associated with the appropriate RT analyses, and the trigger or output configuration must reference the element attributes to be analyzed. Time-series data must be available for those attributes.
6.9.3 Configuring a Process Recipe
Process recipes are managed centrally in Libraries. A recipe contains basic information and an ordered set of levels. The level definitions determine how events are grouped and the analytical granularity available in the workbench.
6.9.3.1 Creating a Recipe
Follow these steps to create a recipe and enter its basic information:
- Go to Libraries → Process Recipes.
- Click the New icon in the upper-right corner of the recipe list. If the list is empty, you can also click New Process Recipe in the empty state.
- Enter the basic recipe information:
| Field | Required | Description |
|---|---|---|
| Name | Yes | A unique recipe name. Path separators and invalid characters such as <>:"|?* are not allowed |
| Base Event Template | Yes | The event template on which the recipe is based. Level attributes come from this template |
| Categories | No | Select one or more categories, or create a category inline |
| Description | No | Describe the recipe's purpose, applicable production line, or other notes |
- Configure the recipe levels as described in the next section.
- Click Save. After the recipe is saved, it appears in the left navigation tree and the recipe list.
New recipes contain five default levels, with the second level selected as the batch level by default. You can modify these levels or add, remove, and reorder them as needed.
6.9.3.2 Configuring Recipe Levels
The level table specifies the grouping attribute, batch anchor, and optional event template for each level. Its columns have the following meanings:
| Column | Description |
|---|---|
| Level | The level order, starting from 1. Event grouping and stage splitting in the workbench follow this order |
| Batch | Identifies the single batch level. It can only be set on the first or second row |
| Attribute | Select an attribute from the base event template as the grouping key for the level, such as Order No. or Batch No. |
| Template | Optional. Select the event template for the level. This is available only for the batch level and levels below it |
| Actions | Move a level up or down, or delete it |
Configure the rows in the order of the actual process. For example:
| Level | Batch | Attribute | Template | Derived Level Type |
|---|---|---|---|---|
| 1 | Not selected | Order No. | Not available | Order |
| 2 | Selected | Batch No. | Batch Event | Batch |
| 3 | Not selected | Unit | Unit Event | Unit |
| 4 | Not selected | Operation | Operation Event | Operation |
| 5 | Not selected | Phase | Phase Event | Phase |
The following rules apply:
- Every level must have an attribute.
- The table must contain exactly one batch level. You cannot directly clear the current batch selection. To change it, select the other row in the first or second position.
- At least one level must remain below the batch level. Otherwise, the recipe cannot be used for batch analysis or saved.
- The batch level cannot be deleted or moved to the third row or lower.
- If the selected attribute name contains
batch, the system automatically marks its row as the batch level. If another row is already the batch level, the most recently selected row takes precedence. - When Batch is the second level, the first level is automatically derived as Order. Levels below Batch are derived as Unit, Operation, and Phase in sequence. These types are recalculated after rows are reordered.
- Template options are descendants of the base event template. An event template can be referenced by only one recipe. When editing the current recipe, templates already referenced by that recipe remain available.
- To add a level, first select a base event template, then click + next to the Process Recipe Levels heading.
- After changing the base event template, the system clears attribute and template selections that no longer apply. Review every level before saving.
6.9.3.3 Viewing, Editing, Copying, or Deleting a Recipe
In the process recipe list, you can search by name, filter by category, and perform the following actions from the row action menu:
- View: Open the read-only detail page.
- Edit: Modify the basic information and levels, then save the changes.
- Copy: Save a new recipe based on an existing one. The system appends a copy suffix to the name.
- Delete: Delete one recipe, or select multiple recipes and delete them in batch.
Deleting a recipe does not delete events that have already been imported. However, you can no longer use that recipe to download templates, group events, or add new batch analyses. Confirm that the recipe is no longer needed before deleting it.
6.9.4 Importing Events Based on a Process Recipe
After you select a process recipe, the system can generate a CSV template containing the recipe attributes and validate event templates and level attributes during import. Download a new template after selecting the recipe instead of reusing a generic event template or a template from another recipe.
6.9.4.1 Opening the Import Dialog and Selecting a Recipe
Follow these steps to enter recipe-based import mode:
- Open the Events list and click the Import Events icon in the toolbar.
- Select the recipe you just configured in the Process Recipe (optional) drop-down list.
- Set the Associated Element as needed:
- In the global event list, select an element from the element tree to apply it to the entire import.
- On an element-level Events page, the current element is used automatically.
- You can also leave this unset and specify each row individually in the CSV's Element column.
- Leave Event Template (optional) empty.
Process recipe and event template import modes are mutually exclusive. Selecting a recipe clears and disables the event template drop-down list. To use single-template import instead, clear the process recipe and then select an event template.
6.9.4.2 Downloading the Recipe Import Template
After selecting the recipe, follow these steps to download and open the template:
- Click EventImportTemplate.csv in the template area of the import dialog.
- Save the downloaded CSV file.
- Open the file in Excel or a text editor, preserving its instruction rows and header row.
A template downloaded with a recipe selected contains:
- The Element and Event Template columns.
- Fixed columns such as Event Name, Start Time, and End Time.
- The union of attributes from the recipe's base event template and all level templates. Attributes with the same name appear only once.
- Recipe-specific instructions listing the event template names that can be entered.
6.9.4.3 Completing the CSV
The template contains fixed event fields and recipe attribute columns. Its main fixed fields are as follows:
| Field | Description |
|---|---|
| Element | The full path of the element to which the event belongs. Complete this per row if you did not select an associated element for the entire import |
| Event Template | Required in recipe mode. It must exactly match the name of the recipe's base event template or a template bound to one of its levels |
| Event Name | Required |
| Start Time | Required |
| End Time | Required |
| Description | Optional free text |
| Severity Level | Optional: Default, Information, Warning, Minor, Major, or Critical. If blank, the template default is used |
| Event Time | Optional. If blank, the system selects a time between the start and end times |
| Reason | Optional free text |
| Categories | Optional. Separate multiple category names with commas and enclose the entire field in double quotes |
Time fields support yyyy-MM-dd HH:mm:ss, ISO-8601, or millisecond timestamps. Rows beginning with # are comments and are ignored during import. The first non-comment row must be the header.
In addition to the fixed fields, complete the recipe level attributes according to the following rules:
- For each row, all attributes from the level of the selected event template and every preceding level are required.
- For example, a row using the Operation Event template must include the order number, batch number, unit, and operation. The lower-level Phase attribute can remain blank.
- Events in the same batch must use exactly the same order number and batch number. Corresponding values must also match for events in the same unit, operation, or phase; otherwise, they are assigned to different groups.
- If the same template is bound to multiple recipe levels, the system validates attribute completeness against the deepest level where the template appears.
- The CSV does not need a Parent Event Name column, and parent-child fields are not used to establish the recipe hierarchy. The hierarchy is represented by the recipe attribute values in each row.
The following example uses the recipe from section 6.9.3.2. Only the main fields are shown for readability:
Element,Event Template,Event Name,Start Time,End Time,Order No.,Batch No.,Unit,Operation,Phase
/Factory/Coating Line A,Batch Event,Batch B20261018-01,2026-10-18 08:00:00,2026-10-18 12:00:00,PO20261018,B20261018-01,,,
/Factory/Coating Line A,Unit Event,Coater 1 Unit,2026-10-18 08:05:00,2026-10-18 11:50:00,PO20261018,B20261018-01,Coater 1,,
/Factory/Coating Line A,Operation Event,Coating Operation,2026-10-18 08:10:00,2026-10-18 10:30:00,PO20261018,B20261018-01,Coater 1,Coating,
/Factory/Coating Line A,Phase Event,Constant-Temperature Drying,2026-10-18 09:00:00,2026-10-18 10:00:00,PO20261018,B20261018-01,Coater 1,Coating,Constant-Temperature Drying
To import a second batch, append its batch, unit, operation, and phase events and change the batch number to the new value.
6.9.4.4 Uploading and Importing
After completing the file, follow these steps to upload and import it:
- Return to the Import Events dialog and confirm that the same process recipe is still selected.
- Select or drag the completed
.csvfile into the file area. Import one file at a time. - Select the file encoding. In most cases, leave this set to Auto. If automatic detection is incorrect, select the actual encoding manually. UTF-32 files are not supported.
- Click Confirm to start the import.
- After a successful import, the system reports the number of imported events and refreshes the event list.
Recipe mode validates the event template and level attributes in every row and aggregates errors for required fields, time formats, severity levels, categories, element paths, and other fields:
- If any row fails validation, the system returns the collected errors and none of the events in the file are written.
- Correct the CSV according to the error messages, then select the file and import it again.
- If the recipe has been modified or deleted since the template was downloaded, download the latest template and complete the file according to the new recipe.
6.9.5 Adding Batches to the Analysis Workbench
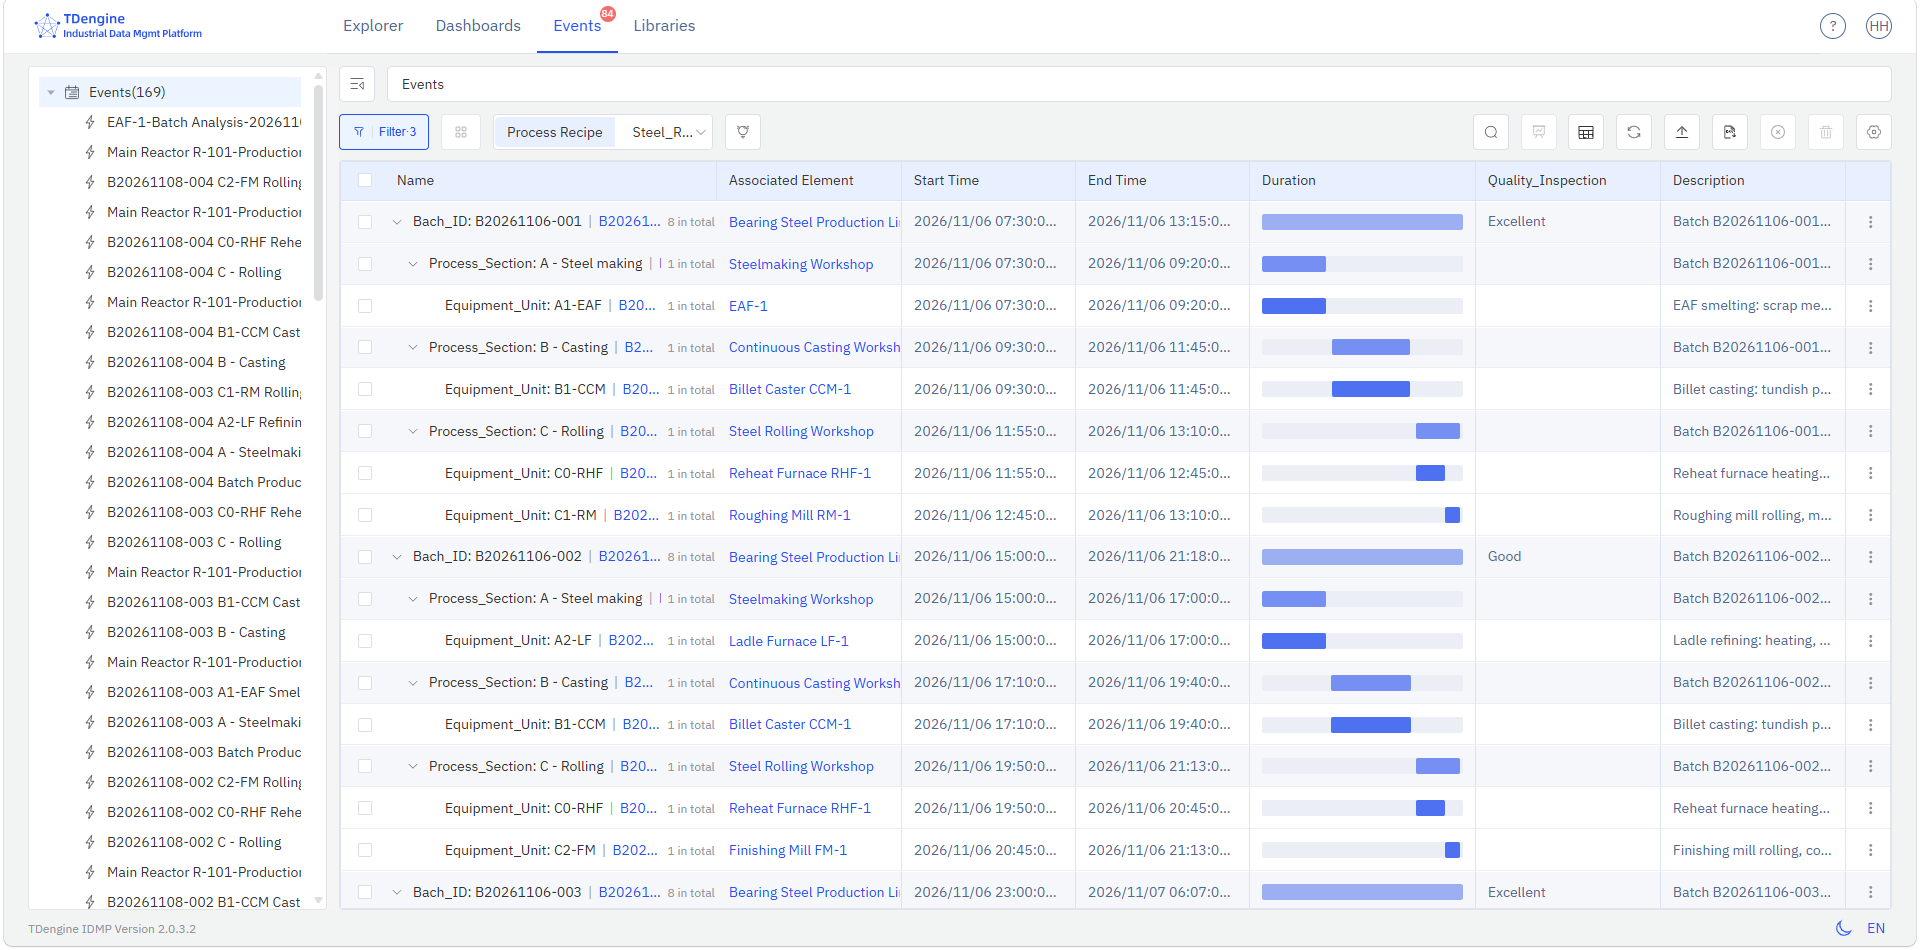
After importing events, you can group them by recipe in the event list and add one or more batches to the same workbench:
- Open the Events list.
- Select the recipe used for the import in the Process Recipe drop-down list in the toolbar. The list switches to recipe grouping mode.
- Expand the upper-level groups, such as orders, and locate the target batch row. A batch row is typically displayed as Batch No.: batch value.
- Open the action menu on the right side of the batch row and select Add to Batch Analysis Workbench.
- The system opens the Batch Analysis Workbench and automatically loads:
- The current process recipe and its levels.
- All events in the batch, including intermediate-level events such as batch-level and stage-level events.
- Process stage columns for the level immediately below Batch.
- Comparison charts for element attributes referenced by events associated with each stage.
- Return to the event list and add other batches from the same recipe in the same way. The existing workbench is reused and brought into focus, and the new batch is added to the current charts.
The following figure shows an example of the event list based on a steel production recipe.
Note:
- Add to Batch Analysis Workbench is available only on batch rows in recipe grouping mode. It is not available on ordinary event rows or other levels.
- A workbench can analyze batches from only one process recipe. The system rejects batches from another recipe and displays a message. To analyze another recipe, close the current workbench and add a batch from that recipe.
- Adding the same batch again does not create duplicate curves. The system reports that the batch already exists.
- If the browser blocks pop-ups, allow pop-ups for the current site and try again.
6.9.6 Using the Batch Analysis Workbench
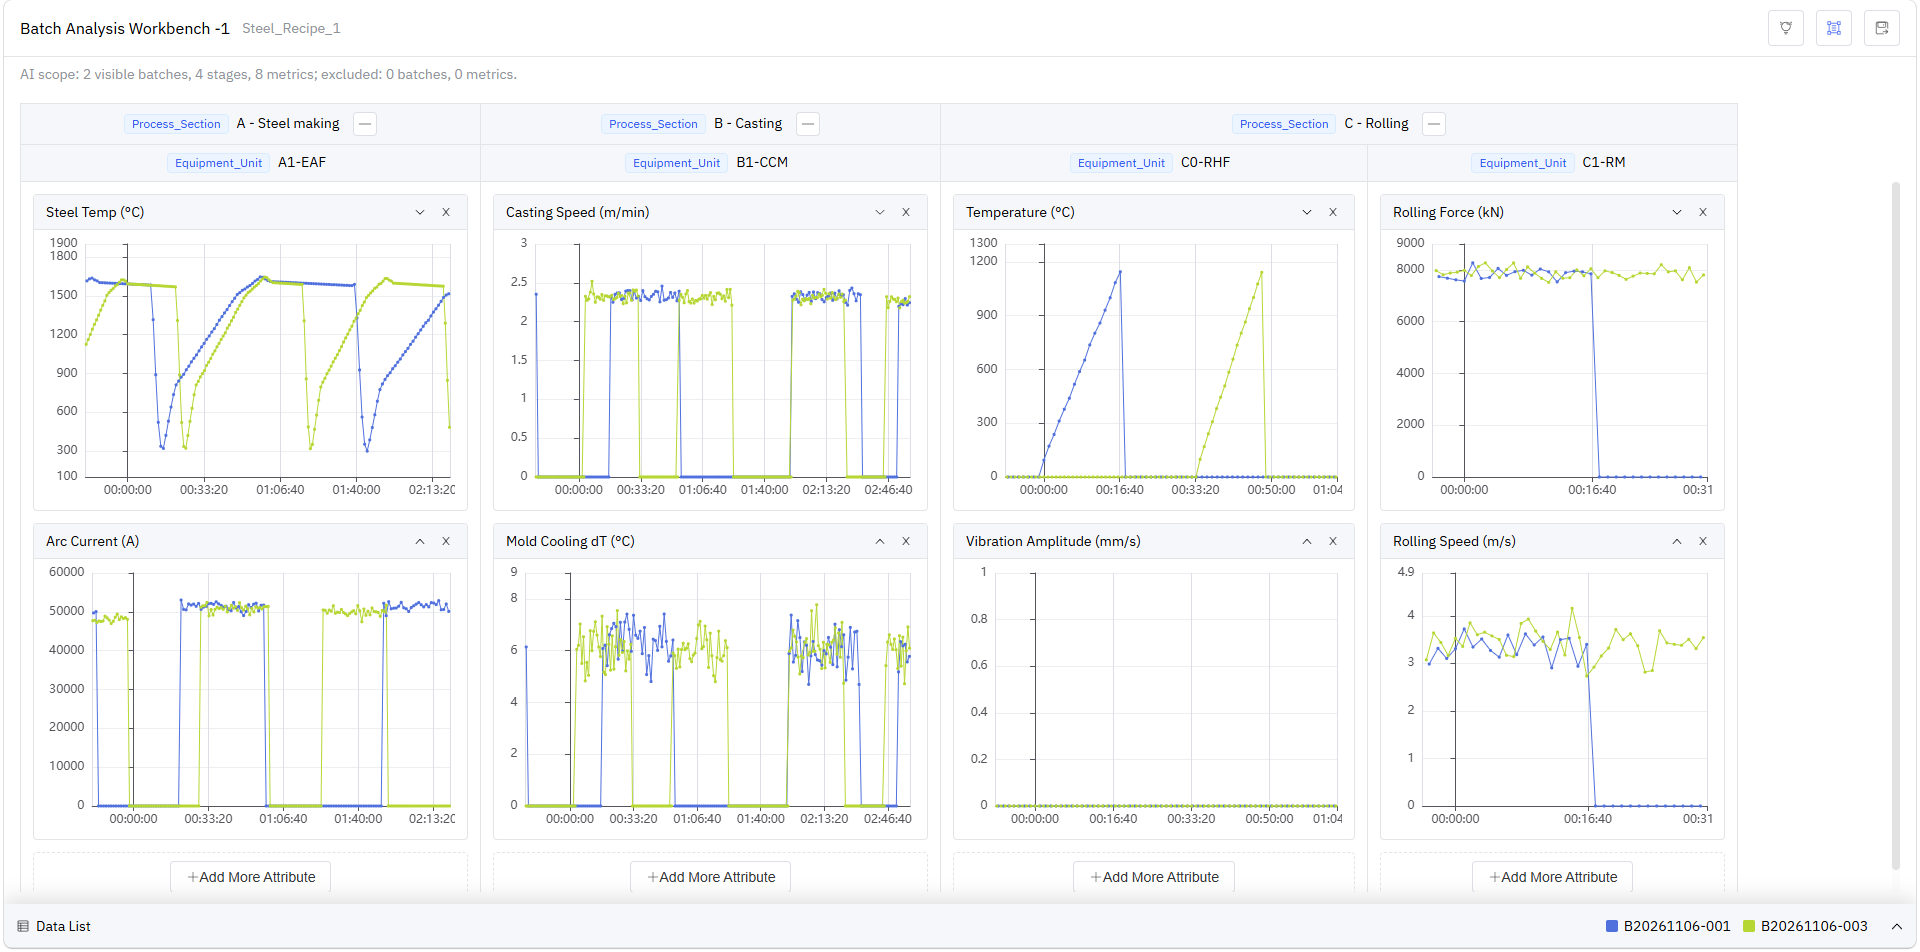
The workbench organizes comparison charts by process stage and provides stage splitting, attribute management, detail views, and panel saving. The following figure shows an example of the Batch Analysis Workbench for a steel production scenario.
6.9.6.1 Page Layout
The top of the workbench displays the current process recipe name. After the workbench is saved as a panel, it displays the panel name. The main areas are as follows:
- Stage column headers: By default, these show the actual groups at the level immediately below Batch, such as units or operations.
- Metric comparison charts: Each stage column contains one or more attribute charts. Each chart overlays curves from all loaded batches.
- Bottom data list: Expand this area to view batch, event, attribute, and process recipe details.
- Batch legend: Located on the right side of the data list header. Each item contains a color block and a batch number. The same batch uses the same color in every chart.
- Save button: Located in the upper-right corner and used to save or update the batch analysis panel.
When there are many columns or charts, scroll horizontally or vertically within the chart area. The headers remain fixed and follow the horizontal scroll position.
6.9.6.2 Reading Multi-Batch Comparison Charts
Each chart represents one element attribute, and each batch is represented by one curve:
- One visible batch: The horizontal axis shows absolute time.
- Multiple visible batches: Curves are aligned to the start time of their respective stages, with the stage start represented as relative time 0. This makes it easier to compare metrics at the same point in the process.
- The chart query range extends 15% before and after the stage start and end times to provide context around the stage. If stage times are missing, the batch time window is used instead.
- For an ongoing batch, the right edge of the time window is the current time.
- Negative horizontal-axis values represent data before the stage starts. For ranges spanning multiple days, day information is added to the relative duration.
Click a batch legend item in the bottom header to hide or show that batch's curves in all charts simultaneously. A dimmed legend item indicates a hidden batch. Legend actions do not expand or collapse the data list.
6.9.6.3 Splitting or Merging Process Stages
Stage columns can be subdivided according to the recipe hierarchy so that metrics can be compared at the appropriate granularity:
- Click + in a leaf column header to split that stage into the next recipe level.
- The + button appears only when the recipe contains a lower level and the loaded events contain actual groups at that level.
- After splitting, the parent heading spans the child columns. Click - in the parent heading to merge them back into the parent column.
- After merging, the parent column contains the combined charts from all child columns. Expanding it again restores the previous child columns, chart deletion state, and column widths.
- Drag the right edge of a leaf column header to adjust its width. When a column is split, the initial child widths are allocated according to the duration of each child stage.
6.9.6.4 Managing Metric Comparison Charts
The workbench automatically generates initial charts by deduplicating the trigger and output attributes referenced by events in each stage. You can also adjust the charts manually:
- Add attributes: Click Add More Attributes at the bottom of a stage column, select one or more regular element attributes from the element tree, and confirm to create comparison charts.
- Reorder charts: Click the up or down icon on the right side of a chart title to change its order within the stage column.
- Delete one chart: Click the close icon on the right side of the chart title. You can add it again through Add More Attributes when needed.
- Hide an attribute: On the Attributes tab of the bottom data list, clear the attribute's checkbox to hide its charts in all stage columns. Select the checkbox again to restore them.
- Delete an attribute: Click Delete on the Attributes tab to remove all charts for that attribute in every stage column.
The same attribute cannot be added more than once to a stage column. Expression attributes are not supported in batch comparison charts; select regular element attributes instead.
6.9.6.5 Viewing the Data List
Click the Data List header at the bottom to expand the drawer. It contains the following tabs:
| Tab | Content and actions |
|---|---|
| Batches | View batch numbers, time windows, durations, and event counts, or remove batches. The duration of an ongoing batch is displayed as - |
| Events | View event names, batches, stages, event templates, and start and end times. Click an event row to open its details |
| Attributes | View attribute names, element paths, current values, last update times, and data reference settings. Show, hide, or delete attribute charts |
| Process Recipe | View level numbers, bound attributes, and bound event templates for the current recipe |
On the Batches tab, click the Delete icon and confirm to remove a batch from the workbench. This removes only its curves and legend item from the workbench; it does not delete the original events from the event list. After the last batch is removed, the page returns to its empty state and can still receive new batches from the same recipe.
6.9.7 Saving and Restoring a Batch Analysis Panel
Saving a panel preserves the current analysis configuration so that the recipe, batches, and chart layout can be restored in a later session.
6.9.7.1 Saving a Panel
Follow these steps to save the current workbench as a panel:
- Add at least one batch and complete any stage splitting, attribute selection, and legend visibility adjustments.
- Click the Save as Panel icon in the upper-right corner.
- When saving for the first time, enter:
- Panel Name.
- Associated Element, selected from the candidate element tree as the panel's location.
- Click Save.
The panel stores the current recipe, batches, stage splitting structure, column widths, attribute charts, and batch visibility state. Clicking Save again updates the current panel; the associated element remains unchanged.
Adjustments that have not been saved as a panel exist only in the current workbench window. Save your work before closing the window if you want to keep the analysis.
6.9.7.2 Restoring a Panel
Follow these steps to restore a workbench from a saved panel:
- Open the panel list for the element where the panel was saved, or open the global panel list.
- Locate the batch analysis panel and open its action menu.
- Select Open as Batch Analysis Workbench.
The system opens a new window and restores the recipe, batches, stage columns, and attribute configuration saved in the panel. Curve data is queried again using the original time windows. You can continue adjusting the restored workbench and save it again.
6.9.8 Frequently Asked Questions
The following questions cover common issues encountered during recipe configuration, event import, and batch analysis.
6.9.8.1 Why does saving a recipe report an invalid level configuration?
Confirm that every row has an attribute, exactly one batch level is selected, Batch is in the first or second row, at least one level exists below Batch, no template is set above Batch, and the selected templates are not used by another recipe.
6.9.8.2 Why does import report an invalid event template?
Confirm that the Event Template value in the CSV exactly matches a template name in the recipe, with no extra spaces, and that the template is the recipe's base template or one of its level templates. Do not use the Event Template drop-down list in the import dialog as a substitute for the CSV's Event Template column.
6.9.8.3 Why does import report missing level attributes?
Complete the attributes for the level of the event template used in that row and for every preceding level. For example, if an operation event is missing its batch number, the batch number must be repeated in that row even if it already appears in another row of the file.
6.9.8.4 Why does the target batch not appear in the event list?
Confirm that the same recipe was selected for import and for the workbench entry, and that the batch number and upper-level attribute values are identical. Different upper-level values create different groups, so the batch may appear under another order or group.
6.9.8.5 Why are no comparison charts generated automatically in a stage column?
Check whether events in the stage are associated with valid RT analyses and whether the trigger or output configuration references element attributes. You can also add regular element attributes manually through Add More Attributes at the bottom of the stage column.
6.9.8.6 How can I refresh data for a batch that has already been added?
Adding the same batch again is ignored as a duplicate and does not refresh its curves. Remove the batch on the Batches tab and then add it again from the event list, or close the workbench and reopen it before adding the batch.
6.9.8.7 Can batches from different recipes be compared in one workbench?
No. Different recipes can have different hierarchies and analysis semantics, so a workbench accepts batches from only one recipe. Close the current workbench and open a new one from a batch row belonging to the other recipe.
